Fujifilm s100fs
All the pictures on this web site were shot in raw, developed with s7raw and
subjected to a mild treatment with Noiseware.
Apart from oversights in all cases the highest possible dynamic range
consistent with the ISO settings ("100%" with 100 ISO, "200%" with 200 ISO, "400%"
with ISO > 400). This because so it is possible to exploit the ability of the camera
of optmizing the exposure curve. In fact the situation is the opposite of what is presented:
instead of increasing the dymanic range by increasing the ISO setting, what has
to be done is applying the highest possibile dynamic range depending from the ISO.
The extension of the dynamic range is innreality just a software trick, in particular
a change of the exposure curve, through which the shadows get brighted.
Theoretically it could be possible to obtain the same results by hand,
but the camera does it very well and much faster!
Regarding exposure an other important point is that now, according
to what described
here, I overexpose as often as possible 0,5-1,5 stops, of course paying attention not to
get a blurred or in some ared burnt picture. By correcting during postprocesing
I can so significantly reduce the noise in the picture.
The image quality which can be reached by shooting in raw is significantly
better than that which can be otained by shooting directly in jpg. The images are better
from the points of view of the detail, from that of noise control (in particular at higher ISO) and
from that of color aberration correction (sometimes present at the shortest
and the longest focal lengths.
The s100fs is one of the few fixed lens cameras with which it is possible to shoot raw without
significant time losses (at least of single shots). It is however necessary to
to use a fast memory card. Do not belive to the ones who tell you
that fast memory cards make sense only in case o dSRLs!
Regarding sharpness, if shooting in raw it is better to set it to "Higher", because the default setting
is rather soft and various details get lost.
If you shoot in jpg things are different, and it is abolutely better to set sharpness to soft, because
otherwise the noise reduction software produces visible artifacts and distorisions.
Regarding white balance, usually the camera is able to find the best setting by its own.
In particular cases (artificial light, panoramas with snow, etc...) it can happen
that in postprocessing a better white balance setting can be found. For example, in the case
of snow the setting "Average" of s7raw is ofter better than that of the camera.
In general I shoot with option Fast Autofocus switched to On. At least in conditions of good light
the autofocus gets in fact faster.
Not much, but the difference is significant. About the opinion that this setting can
worsen the autofocus efficency in low light conditions, I am not able to give a final answer.
It is difficult to judge, because in low light conditions the autofocus has more
difficulties anyway.
In most situations the best autofocus mode is "Center", which focuses on the middle of the
image. "Multi", which let the camera choose the
the area of the image on which to focus, is only seldom useful, beacuse it is difficult
which area the camera will choose. Maybe it is suitable for taking pictures of flying
airplanes, because in general the camera chooses a more contrasted area.
But in the case of fast objects, like birds, Multi is doesn' t work well, because the
camera looses time trying to understand where to focus on, before starting with the
proper focusing.
The Continuus Focus Mode should be avoided, beacuse it rarely permits to really
reduce the focusing time, but it strongly reduces the battery duration.
The manual focus is very difficult to use. In fact it is difficult to correlate
the rotation of the gear with effect produced, both because of the unsufficient resolution
of the electronic viewfinder (in particular with low light conditions), and, and most of all,
because of the lack of proportionality between the rotation of the gear and the real
machanical movement produced in the lens system. But it is possible that with
some practice it could be possoble to use the manual focus in some specific situations
where the autofocus is impossible to use (for example a subject behind a net). On the other hand
passing to manual focus can be used to freeze a certain focus setting. This will
be maintained until you keep the camera in Shooting Mode. Pay attention that switching
to Playback Mode causes the focus setting to get lost!
For macro photography the best setting is, apart from extra filters, to set the focal length to the maximum
and use "Macro" mode. "Supermacro" is in a certain sense useless, since the more you can get nearer
to the subject, the more you have to reduce the focal length, so that at the end the dimensions
of the subject in the picture practically rimains the same, but its shape risults distorted because
of the short focal lengthes. And in many cases coming so near to the subject (for esmple in case
of insects) is impossible anyway.
The LCD screen tends to show the pictures a little bit lighter than what they really are. It is therefore
better to set its brightness to -1 or -2 in order to better understand if the pictures are correctly exposed.
Important note: When you change some saveble setting (I mean which can be saved in one of the tho custom modes
C1 and C2) while you are in C1 or C2 mode, these changes remain in the mememory of the C1 and C2 settings
also when you switch out of the custom mode. The two C1 and C2 custom mode return to the original
saved settings when you switch the camera off and turn it on again. Pay attention!
Metz 36C-2
This flash unit proved to be very efficent and easy to use. With some practice the absence
of the TTl connection becomes a very secondary problem.
The flash possesses a sensor which is able to estimate (in automatic mode) when
the light reflected from the subject has reached the level which is considered correct and
the light emission can be interrupted. On the backside there are two switches: one
for setting the operting mode (manual or automatic) and one for choosing
the reflected light quantity which is considered correct.
In manual mode the light quantity emitted is always set to the maximum (the flash
dosn't use the sensor)
The two mobile gears, for ISO and aperture, just give indications to the user,
but are not connected to any internal mechanism and don' t influence the
emittetd light quantity.
For portraits, half lenght photographs and also full persons it is possible to use
the lowest intensity mode, optimizing the exposition by varing the aperture mode around
a medium level (4,5 can be a good starting point). For group pictures from a little larger distance
it is possible to increase the aperture up to the maximum (2,8). In case of pictures
from greater distances, with larger focal lengthes, as a first thing you can shift forward
the flash zoom, in order concentrate the light in a more narrow area and/or switch to a higher
light emission quantity. In this way it is not necessary to increase the ISO, which would
increase the noise.In this way, with the flash zoom and the light emission at its maximum,
at ISO 400 it is possible to shoot subjects up to 15m distance.
Some pictures were shot whith the flash light directed toward the celing. In this case
it is necessary to increase the ISO and the light quantity settings, often strongly.
The necessary change depends on the height and on the color of the ceiling.
s7raw
A problem of s7raw is that (from what I know) there is no ufficial help. The meaning of
the various settings has therefore to be found out through "trial and error".
As already told on this page, regarding white balance usually the camera is able
to find the best setting by its own.
In particular cases (artificial light, panoramas with snow, etc...) it can happen
that in postprocessing a better white balance setting can be found. For example, in the case
of snow the setting "Average" of s7raw is ofter better than that of the camera.
When shooting raw the s100fs has the tendency (at least using s7raw) to overemphesize the blue tones and
fade a little bit the green tones. To compensate this tendency I set, on the
fine white balance settings panel, +3 for the green tones and -3 for the blues. In reality
this is not enough and it is necessary to use the settings on the panel "Color" (after having activated
the option "Selective colors"), which should influence the demosaicing algorithm.
At the green level it is necessary to set large negative values for red and green (like -75) and
positive values for green and black (10 and 75 respectivly). The exact meaning of these settings
are not exactly clear, but the result goes in the right direction. It must be said that changing
the color setting can produce color aberration (granulations and abrupt local color changes) in
the part of the picture where the color is more intense.
It is also useful to act (less strongly) on the cyan settings, since the camera tends to
overemphesize the cyan tones. You can for example set -10 for Green and 5 for Blue.
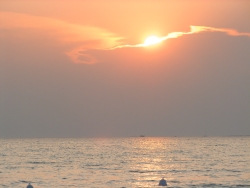
It is better to avoid avoid the options "Vivid" and "Green" on the first panel, because they produce
visible artifacts in the form of halos and granulations. See for example the following sunset:
|
Vivid: off; Green: off
|
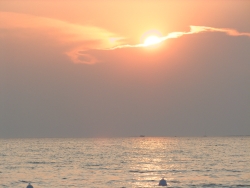
|
Vivid: on; Green: off
|
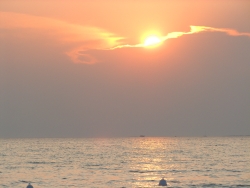
|
Vivid: off; Green: on
|

|
Vivid: on; Green: on
|
At the level of the second panel ("Adjust2"), the parameters which have given the best results
are "Log", with values between 1,9 and 2, "Contrast", "Brightness" and "Hue" set to 0,
"Saturation" between 50 and 65, depending on the case. Regarding the parameter
"SR mixing", you can use the option "Easy Mode" with standard settings.
Regarding the panel "Detail", it is certainly good to set "Sharpness" on Hard, since
otherwise many details would get lost. "MoireCancel" has always been kept on 1 and 40
for the two parameters respectively, but there has never been the need to work on these
parameters.
Vry important is the section "Noise Reduction", although the only important parameters
seem to be "Amount" and "Smooth", since "Radius" and "Edge" almost don't influence
the final result. "Amount" can be kept o the maximum, since s7raw doen't have the tendency
to flaten too much the details. For "Smooth" you can use values between 60 and 120. In the first
case there will remain some more noise and details, in the second case less. It is a matter
of taste. It must be said that at the moment of applying Noiseware, a lower "Smoothing"
setting must be a little bit compensated and in any case it will let you have some
more granulosities but with more details. Here an example (click on the two pictures to
download the crops in theis original size)::
|
Smoothing: 60
Noiseware settings: Luminance = 30, Color = 75, Sharpening = 0
|
|
Smoothing: 120
Noiseware settings: Luminance = 30, Color = 60, Sharpening = 1
|
The page "Curve" gives the possibility to regulate the exposure curve, which has the
function to translate the measured luminosity in the final visible luminosity.
As a default it is a straight line, which means that if the measured luminosity is x
the luminosity in the final picture will remain x. The most frequent modification is
the reversed S shape, which brightens the darker parts of the picture and darkens
the brighter parts. Usually very flat S are sufficient to give a sensible result.
In these cases it is usually useful to add a slight underexposure (ca. 0,3 stops)
and an increase of the saturation (ca. 10 points).
In reality the curve can be manipulated in a much more sophisticate way, with the possibility
to manipulate the colors red, green and blue separately and to add many different nodes
(the S curve has only one node, ca. in the middle). The set of possible solution
increases so to the infinitum and there is the risk to obtain a well looking picture, but
far away from the original scene. Up to now I have therefore used only simple S curves!
Noiseware
Although Noiseware possesses a real Help, it is not very good, and for some of the settings it is impossible
to comprehend the exact meaning and effects. In particular this is the case of the two
parameters of the panel "Noise Level Adjustment". They could indicate the sensitivity
toward the two types of noise. But trials seem to indicate that the same final results
can be obtained by changing the the two main pamaters, "Luminance" e
"Color" of the panel "Noise Suppression". In other words, if you increase the values of the first two,
you can use lower values for the second ones and vice versa.
More obvious is the meaning of the controls which permit to adjust separately the noise suppression intensity
for the different noise frequencies. In fact there was never the need to change their values and
they have always been left on their default values, 100%.
Apart from rare ecceptions all the pictures on this web site have been treated with Noiseware whith
the following settings: Noise Suppression Luminance = 30%, Noise Suppression Color = 60% and
Sharpening = 1. They represent a good compromise, which permits to eliminate a good amount of noise
and to preserve most of the details at the same time. The final images appear smooth and natural
even if seen at full resolution.
Silkypix (used for the Panasonic G2)
SILKYPIX is a rather convoluted program, with too several settings practically duplicated, so it
is quite difficult to learn to use. It should however be mentioned that also other programs,
such as RawTherapy, are anything but easy. RawTheray, in particular, provides so many
parameters to be set that identifing the best setup becomes virtually impossible.
SILKYPIX was chosen as the processing program of the Panasonic G2 raw files both because it
comes free with the purchase of the camera (including updates) and, mainly, because it is
it is the program, among those that are accessible for free, which allows the best
managment of noise. Unfortunately it is not also the one that allows you to get most detail. But you can
not have everything!
Given that some of the parameters are still obscure in their exact meaning to me, I will present the
ones I think are the most important ones to get a good result.
One of the most important items is the first, i.e. white balance. Unfortunately, as already mentioned,
it is not possible to find a balance that works for all cases, much less the one proposed as a
standard by the program, which delivers sad and lifeless colors.
It was therefore necessary to identify at least three different white balances out: one for landscapes,
one for photos with the flash and one for pictures for dimly lit rooms. The biggest difference is at
the level of color temperature: 5500K for the landscapes, 6000K for pictures with flash and 3200K for dark interiors.
In addition there are some small optimizations on the panel "Color fine Control".
Other differences are at the level of the panel "Color tones", with contrast between 1.2 and 1.45 depending
on the case, the "Center of contrast" between 0.3 and 0.45, "Dynamic range" of 1 and "Black level" between
2 and 4. This last parameter can be brought to 0 in the case of very dark photos.
Regarding the saturation it goes from 1:05 to 1.2 depending on the case. However, saturation and
contrast can easily be optimized also on the final jpg.
As for the panel "Sharpness", the parameters of which are "Emphasis contour", "Emphasis details" and
"False contour control", the values are respectivly 50/5/0 for landscapes, 10/60/0 for pictures with flash
and 50/5/0 for dark interiors.
Important is the fact that in the panel "Noise Reduction" all valuesare set to zero. The noise
reduction is therefore totally delegated to Noiseware, for which a not little research was required to find
the setting able to get a final noise pleasing to the eye even looking at the pictures in full resolution.
In general it is better to activate the option "Shading" in the panel "Aberration of the lens control",
as automatically
corrects for vignetting in proper way depending on the lens and the focal length used.
Noiseware
Noiseware is a rapid and effective program. It the disadvantage of having a really insufficient Help,
and the meaning of the various parameters can be guessed only by trial and error!
I state that my philosophy is to use for all pictures taken with the same camera on the same setup. This
is because it allows an easier comparison between the various pictures.
For the Fuji s100fs finding the best setup was easy: I use all default parameters, except for 30% Noise
Supression - Luminance, 60% for Noise Supression - Color and +1 for Sharpening.
It was much more difficult in the case of Panansonic G2. The problem with it is the fact that,
when dealing with the noise, the tendency to give life to ugly artifacts
(which look like little warms) is much stronger than with the Fuji s100fs. At the end I was able
to identify the setup shown in the picture below, which permits to avoid the problem:
Faststone
The setup for Noiseware shown above may sometimes not reduce enough the noise,
in particular in case of photos taken in low light. Especially in the case of the photos taken with
the Panasonic G2 it has proven useful to apply to such images the noise reduction function of Faststone, in
itself a simple program for cataloging and basic processing of images. With both the Fuji s100fs
and the Panasonic G2, the setup is in the following image:
It is very useful especially in the case of Panasinic G2, which often shows a residual chroma noise
much stronger than luminance noise. A treatment of this type reduces the perceived noise without
creating unpleasant artifacts and without significant loss of detail.